Don't forget to subscribe to my new website, quickwhittravel.com! The newest post is up to give you some road trip ideas!
http://quickwhittravel.com/2016/03/29/7-day-trips-from-dc/
Tuesday, March 29, 2016
Wednesday, March 23, 2016
Big News... We're Moving!
Hello, my faithful readers! I announced in yesterday's post that I had some big news to reveal today and here is it:

We're moving! To our own website!
I will no longer be posting here; when Steve, Mr. Peabody Pembroke, and I travel or share our traveling tips, we'll be posting to the new site!
http://quickwhittravel.com
Please check it out! If you are subscriber to quickwhit.blogspot.com, you can also subscribe to the new website! Just click "Subscribe" on the right side of the page, enter your e-mail address, and you'll be notified when I publish a new post!
Thanks for traveling the world with me over the years, and please continue to travel with us on quickwhittravel.com!
Tuesday, March 22, 2016
Packing Strategies VI: The Journey Home--and an Announcement!
Welcome to our last installment (for now!) of Packing Strategies. I hope you've enjoyed the series. I have some more fun posts queued up, so be sure to check back soon!
You made it! You packed your best bag, didn't have anything taken away at security, got to keep your luggage on that tiny regional jet, and you had a blast on your trip! But now you have to get home with all your stuff and your souvenirs, too!
You've come to the right place! I once brought home a 35-piece set of formal dishes from Switzerland. And I didn't have to throw away anything else I brought! I did have to borrow a small roller board from my friends there, but I got it all home, and nothing broke!
When you're packing to come home, there are a few things you may want to keep in mind. What tricks do you have for packing for the journey home?
1. Look Around
This one seems pretty obvious, but it's a basic point that I often disregard (and I've left things because of that--conditioner, earrings, and the like). So, take a last look! While I'm in a room, no matter how many nights, I try to keep everything I unpack pretty close together and in consolidated spaces. It has kept me from losing more things for sure! It's always good to stay organized, and always good to do just one more walk through to open all drawers and look in all closet spaces before you check out.
Oh, and do the same thing in the overhead bins on aircraft! Steve seems to always be losing things in flight! This includes, pullovers, earbuds, thumb drives, and even an expensive GPS watch! I know you're tired and ready to get off that plane as soon as you can, but you'll be sad when you realize your lucky earbuds were in the back corner of the bin, and you didn't take a second to look!
2. Use What You Have
This one goes for bringing home breakable souvenirs. Steve and I collect Starbucks mugs, and that's pretty much the only thing we bring home with us. Overall, that's a pretty inexpensive souvenir, and we never forget where we got it!

But even if it comes in a box (maybe it does, maybe it doesn't), sometimes that box is flimsy and not great for packing. So what do you do? I do one of two things: 1. Wrap breakables up in clothes and try to keep them either at the top or outer pocket of my luggage (so I can keep an eye on it); or 2. Wrap it up and rig it in the middle of my luggage, packed tightly so it won't move around. The real key is to make sure it doesn't move!
And that's exactly how I got 35 pieces of a formal dish set home in my luggage. I wrapped each piece individually and made sure they were tightly packed (and very padded with socks and such).
3. Make Room
This one may require a bit of pre-planning. An easy way to make room for souvenirs is to get rid of things you packed. I keep clothes that happen to be on their last threads and just plan on packing them for trips, then leave them there. It makes room and makes for a lighter pack on the journey homeward!
4. The Unclean
That's right, laundry. By all means, bring a separate bag for your dirty clothes. It can be a plastic grocery bag or a fabric bag, whatever you like. I usually prefer plastic in case something is wet, like a bathing suit or a shirt I needed to rinse out before going home. And it's best if you can fold or roll them like you did when you packed at home. I know it may sound silly to roll your dirty clothes, but they will pack up much better that way!

5. Pack Your Patience
Lastly, everyone's favorite--patience! Sure, you're rushing to get out before check out time, you're ready to get home, etc., but you'll do yourself a favor by slowing down and re-packing neatly instead of shoving things in willy-nilly. This piece of advice comes not from me, but from my husband! He is a packing shover, but he always regrets it. Things get lost, broken, or plain don't fit when you shove in a hurry instead of rolling and putting toiletries and other items away neatly.
Be sure to check back TOMORROW for a BIG ANNOUNCEMENT! This is pretty monumental, so get excited with me!
You made it! You packed your best bag, didn't have anything taken away at security, got to keep your luggage on that tiny regional jet, and you had a blast on your trip! But now you have to get home with all your stuff and your souvenirs, too!
You've come to the right place! I once brought home a 35-piece set of formal dishes from Switzerland. And I didn't have to throw away anything else I brought! I did have to borrow a small roller board from my friends there, but I got it all home, and nothing broke!
When you're packing to come home, there are a few things you may want to keep in mind. What tricks do you have for packing for the journey home?
1. Look Around
This one seems pretty obvious, but it's a basic point that I often disregard (and I've left things because of that--conditioner, earrings, and the like). So, take a last look! While I'm in a room, no matter how many nights, I try to keep everything I unpack pretty close together and in consolidated spaces. It has kept me from losing more things for sure! It's always good to stay organized, and always good to do just one more walk through to open all drawers and look in all closet spaces before you check out.
Oh, and do the same thing in the overhead bins on aircraft! Steve seems to always be losing things in flight! This includes, pullovers, earbuds, thumb drives, and even an expensive GPS watch! I know you're tired and ready to get off that plane as soon as you can, but you'll be sad when you realize your lucky earbuds were in the back corner of the bin, and you didn't take a second to look!
2. Use What You Have
This one goes for bringing home breakable souvenirs. Steve and I collect Starbucks mugs, and that's pretty much the only thing we bring home with us. Overall, that's a pretty inexpensive souvenir, and we never forget where we got it!

The collection! Safely transported with no breaks... yet!
But even if it comes in a box (maybe it does, maybe it doesn't), sometimes that box is flimsy and not great for packing. So what do you do? I do one of two things: 1. Wrap breakables up in clothes and try to keep them either at the top or outer pocket of my luggage (so I can keep an eye on it); or 2. Wrap it up and rig it in the middle of my luggage, packed tightly so it won't move around. The real key is to make sure it doesn't move!
And that's exactly how I got 35 pieces of a formal dish set home in my luggage. I wrapped each piece individually and made sure they were tightly packed (and very padded with socks and such).
3. Make Room
This one may require a bit of pre-planning. An easy way to make room for souvenirs is to get rid of things you packed. I keep clothes that happen to be on their last threads and just plan on packing them for trips, then leave them there. It makes room and makes for a lighter pack on the journey homeward!
4. The Unclean
That's right, laundry. By all means, bring a separate bag for your dirty clothes. It can be a plastic grocery bag or a fabric bag, whatever you like. I usually prefer plastic in case something is wet, like a bathing suit or a shirt I needed to rinse out before going home. And it's best if you can fold or roll them like you did when you packed at home. I know it may sound silly to roll your dirty clothes, but they will pack up much better that way!

5. Pack Your Patience
Lastly, everyone's favorite--patience! Sure, you're rushing to get out before check out time, you're ready to get home, etc., but you'll do yourself a favor by slowing down and re-packing neatly instead of shoving things in willy-nilly. This piece of advice comes not from me, but from my husband! He is a packing shover, but he always regrets it. Things get lost, broken, or plain don't fit when you shove in a hurry instead of rolling and putting toiletries and other items away neatly.
Be sure to check back TOMORROW for a BIG ANNOUNCEMENT! This is pretty monumental, so get excited with me!
For more packing strategies, check out:
Wednesday, March 16, 2016
Packing Strategy V: Luggage Minimization
Welcome to our next installment of Packing Strategies! This week we're addressing the fashion staple of the travel world... Luggage!
Now that we know how to pack, it's very important to choose the right vessel. You want one that's easy to pack, easy to access, easy to tote, and easy to heft into those overhead bins! Journey through time with me to the suitcases of yesteryear...
Who remembers these beauties?


Now that we know how to pack, it's very important to choose the right vessel. You want one that's easy to pack, easy to access, easy to tote, and easy to heft into those overhead bins! Journey through time with me to the suitcases of yesteryear...
Who remembers these beauties?

My grandparents got these suitcases to go on their honeymoon in January 1954!
And my parents got a set similar to this when they got married in 1980:
Totally cool, right?
Each of these sets of suitcases were the best of the best in their day. Today we think we have it all figured out, but just remember, so did your parents and grandparents! To be honest, it really depends on your preference. I like to travel light, and I do not like to drag stuff behind me. Other people prefer to roll their luggage instead. Here's a look at the things we use to lug our stuff from town to town, state to state, coast to coast, country to country, and continent to continent. What's best for you?
1. Backpacks
This is my preferred packing pal. Backpacks are usually flexible, stuffable, and expandable. You can also wear one on the front and one on the back, like Steve and I usually do when what we need can't fit into just one bag. You can move a lot faster than if you're dragging a roller bag, and your hands are free to juggle your passport, boarding passes, coffee, ID, phone, and whatever else you need to have in your hands.
The backpack in the picture below also has two straps that secure it to your waist (and keeps the weight on your hips), and around your chest as well. Once you figure out exactly how to adjust them for your body (which took me a year!), it's really helpful for your back. Stabilization is the key!

Samantha likes to participate for comparison's sake. This backpack is stuffed tight!

Best things about this backpack: front pockets, side pockets, padded against my back, laptop compartment inside, and several compartments for pens, books, and any other little things I need to have accessible. Oh, and it's been going strong since 2004!
2. Duffles
This is the next best thing to a backpack because you can still wear it on your back, even without the straps around your waist and chest. Again, you can put a duffle on your back, a backpack on your front, and you have use of your hands! It's also nice to be able to distribute the weight on both the front and the back. No one likes to fall backward!
Added bonus: duffles and backpacks can squeeze into some small overhead bins on planes, trains and automobiles. I've been permitted to keep my bags with me (always the goal) instead of surrendering them to many a flight crew! I'm not a fan of checking my bags, even plane side, because it slows me down! It's easier to be flexible if your luggage is with you.

Photo taken at our hotel in Prague 2012. I'd been exploring Europe this way for over two weeks!
3. Roller Boards
It is my own opinion that roller boards are the worst. I always kick them when I wheel them behind me, they are not flexible because of the hard case (and thus cannot fit into most overhead bins on planes), you have to be holding it with one hand at all times, and they are always heavier to begin with than a non-roller board. Some people need to be able to roll their bag instead of carry it, sure, but if you're physically able to carry your luggage, I recommend doing it!
That said, if you want to check a bag or have to check it because of unallowable items (like liquids more than 3 ounces or that Swiss army knife you picked up as a souvenir in Zurich), this is definitely your best bet. Because they are more solid that a backpack or duffle bag, they will keep your luggage safe and secure! Have you seen the way luggage gets man-handled going to and from the plane? And what if your bag gets stuck on the bottom of a stack of 10? The harder bag will keep your valuables from getting smushed!

Steve's old roller board, safely tucked away on the shelf in the closet!
So what are your luggage tips and tricks? What do you use to tote your stuff from one continent to the next? I want to hear from you!
For more packing strategies, check out:
Friday, March 11, 2016
What to Do When Your Flight is Cancelled
I'm sitting at an adorable coffee shop in the San Francisco airport as I type this. I didn't anticipate having time to blog today, but something happened that is giving me plenty of time... our flight was cancelled!
There we were, up above the world, flying for nearly six hours from Washington Dulles to San Francisco, reading and minding our own business. We landed pretty much on time, in the fog and rain, and planned to pick up a to-go lunch on our way to the next gate for our final flight to Burbank. We turned our phones back on, and--so exciting--we had many emails to check! But one such e-mail was less than delightful. While we flying along all relaxed and dandy, our flight to Burbank was "cancelled due to air traffic control conditions impacting our flight operations." We later speculated it was due to Nancy Reagan's funeral, which the airlines should have been aware of before the day of, but that's another beef.
So, what do we do? Here's the checklist:
1. Forget to Panic!
Seriously, if you travel much, you start to realize it happens a lot more often than you'd like to think, and there's always another flight or another series of flights to get you where you need to be. In the worst-case scenario, you'll have to wait 24 hours, but sometimes you get lucky and you can be put on an earlier flight, or even a non-stop flight allowing you to avoid an anticipated layover! I've yet to have to wait until the next day to fly out, but I have enjoyed the last two scenarios. The point being, it'll all work out! Don't sweat it, just forget to panic and continue on with this list.
2. Call your Airline
It may seem obvious when you're not in the moment, but it's probably the most important thing to do. As a proactive measure, put the airline's phone number in your phone, and have a hardcopy as well, just in case. If you're traveling internationally, calling may not be an option. But if you have a situation like Steve and I did trying to get out of Quito, don't be afraid to ask a nearby business (hotel, restaurant, etc.) if you can use their wi-fi and/or telephone to call the airline's local office.
Another tip: If you know someone who's loyal to the airline you're taking, ask if they have a special number you can call. For instance, Steve and I are loyal to United, which is part of the Star Alliance. We have a special "1K" phone number to call when we need assistance, and we can get through to a representative without going through a bunch of automated options. The secret is... anyone can use that number. ;)
3. Go to Customer Service
Double your chances! In addition to calling (not instead of calling), also get yourself to that customer service desk. Don't walk--run! Get there as quick as you can, especially if you were supposed to be on a large flight or if there are very few flights like yours per day. Talking to a live person can be very encouraging and helpful, but by all means, remember that they are just humans, and they are doing what they can. It may not seem like they're working as fast as possible, but they will surely be faster when helping a pleasant person as opposed to a jerk. Don't be the jerk. Be nice, and be part of the solution!
And be sure to STAY on the phone. Sometimes the customer service line doesn't move, so you might actually get through a long hold or a bunch of automated systems before you get to the front of the customer service line.
4. Find Your Own Options
If you're not a frequent traveler or you're flying on an unfamiliar airline, you're sort of at the mercy of whoever's on the other end of the phone or the other side of the counter. But if you do a little quick searching, you can find out what other airlines are partnered with yours (and thus what other airlines you could take), when the next flight is scheduled (so you can suggest that if you need to), and what other routes will get you to your destination (because sometimes you have to think out of the box!).
So, you're on the phone with someone, you're waiting in line to talk to someone, why would you need to do anything else? Well, because those people are just people. They have a computer system and special privileges to change your flight plans for you, so you need them, but more brain power is better than less. Steve and I have had to ask for specific routes and flights, suggest something other than what the representative can (or will) tell us, and even tell them a flight number a time or two. Sometimes they make mistakes, sometimes their system isn't showing everything it could be, and sometimes they just don't think of an option that we might think of on the spot. Do a little of your own dirty work, even while you're on the phone or with a customer service representative.
To be fair, this comes from a girl who, just this morning, forgot to push her carry-ons through the security machine. And got loudly reprimanded by one of the TSA agents on duty. And got the dirtiest looks imaginable from others in the TSA Pre-Check line. We all make mistakes!
5. Find Your New Gate
You did it! You have your new flight! Now, immediately go find your new gate. It might be really far from where your old gate was or where you are right then. Be sure you know how to get there and when your new flight leaves! I once almost missed a flight to Istanbul because I thought I knew where my gate was... but in reality it was much farther than I anticipated! I made it with minutes to spare. Do not cut it close!
6. Enjoy Your Downtime
If you have lots of time to fill (like Steve and I do in San Francisco today), make the most of it! If you're far from home and have several hours to fill (four or more hours), go out and explore your layover city! The only true regret I have from my travels is not exploring Amsterdam during a nine hour layover traveling from Switzerland to DC.
Today, Steve and I had a leisurely brunch at an airport eatery, walked every corridor to which we had access, and now I'm chillin' with my duck Mr. Peabody Pembroke and enjoying a latte and a cream puff while Steve gets more steps in. Oh, and I'm blogging, too.

Yum!
Tuesday, March 8, 2016
Packing Strategy IV: Accessorize, Prioritize
Welcome to another installment of Packing Strategies!
This week we're looking at accessories. Gentlemen, for you that's mostly a watch and perhaps a wedding ring, but I have some tips for you, too! Ladies, there are quite a few more possibilities for us, and we'll get to those in a moment.
Men:
1. Watches
Leave the Rolex at home! And maybe the same for your nice, non-waterproof GPS watch, too. Some places you go are fine for that sort of thing (Monaco, for instance), but others are maybe not as safe for those things. In second- and third-world countries, or other countries with a high crime rate, wear a watch that is non-descript.
2. Rings
Hopefully your wedding ring won't be coming off at any time, but it may be a good idea to have a less expensive "decoy" ring that you wear while traveling, and leave your expensive ring at home. You can get inexpensive decoy rings on Amazon and the like. I actually bought a generic tungsten ring for $13, and it's the one I wear at the gym and when I travel to some countries.

Women:
1. Fine Jewelry
To piggy-back on that last point, ladies should also consider leaving those expensive pieces at home. Especially that flashy engagement ring for those diamond earrings you got for college graduation. Better safe than sorry!

2. Costume and Statement Jewelry
These are pieces that can change an entire outfit! I am tremendously in favor of re-wearing clothes when I travel because I like to travel light. A colorful necklace, earrings, or bracelet can make a black outfit look completely different than if you wore the black outfit on its own. Turquoise goes with almost everything, and so do pearls. Or if there's a color you particularly love or one that looks best on you, plan to wear a couple of outfits that are different from each other, but that both go with that color and piece of jewelry. Instead of two outfits, you now have four combinations!

3. Scarves
Scarves are so handy. A good scarf can be a cover-up for temples or other conservative places you may visit, a light blanket on a chilly plane, an accessory like the jewelry mentioned above, a wrap-around top, a bathing suit coverup, or perhaps for its intended purpose... a scarf! I almost never leave for a trip without a scarf, no matter what season or what the weather at my destination.

4. "Stuff" Carriers
In recent years, the travel industry has come up with stuff carriers that are leaps and bounds better than the fanny packs and money holders of yesteryear! Here's one that goes on your wrist and holds an iPhone 6 (they also make one big enough for the larger iPhone 6s). It also has a zipper pocket for cash or credit cards.

And here's one that goes around your waist. I mostly use it when I run to carry my ID, keys, and maybe cash or a credit card if I plan to stop for coffee somewhere. But it can also be used when you're just walking around a new city and want a little extra security for your money. It has a clip for your keys, and it fits well under your clothes.

What other accessories do you use when you travel? What other tips do you have?
For more packing strategies, check out these blog posts:
Packing Strategies I: Roll with It!
Packing Strategies II: Tetris Packing and an Element of Fun
Packing Strategies III: Adventures in Toiletries
This week we're looking at accessories. Gentlemen, for you that's mostly a watch and perhaps a wedding ring, but I have some tips for you, too! Ladies, there are quite a few more possibilities for us, and we'll get to those in a moment.
Men:
1. Watches
Leave the Rolex at home! And maybe the same for your nice, non-waterproof GPS watch, too. Some places you go are fine for that sort of thing (Monaco, for instance), but others are maybe not as safe for those things. In second- and third-world countries, or other countries with a high crime rate, wear a watch that is non-descript.
2. Rings
Hopefully your wedding ring won't be coming off at any time, but it may be a good idea to have a less expensive "decoy" ring that you wear while traveling, and leave your expensive ring at home. You can get inexpensive decoy rings on Amazon and the like. I actually bought a generic tungsten ring for $13, and it's the one I wear at the gym and when I travel to some countries.

$13 plain, boring, damage-proof tungsten ring for gym and travel
Women:
1. Fine Jewelry
To piggy-back on that last point, ladies should also consider leaving those expensive pieces at home. Especially that flashy engagement ring for those diamond earrings you got for college graduation. Better safe than sorry!
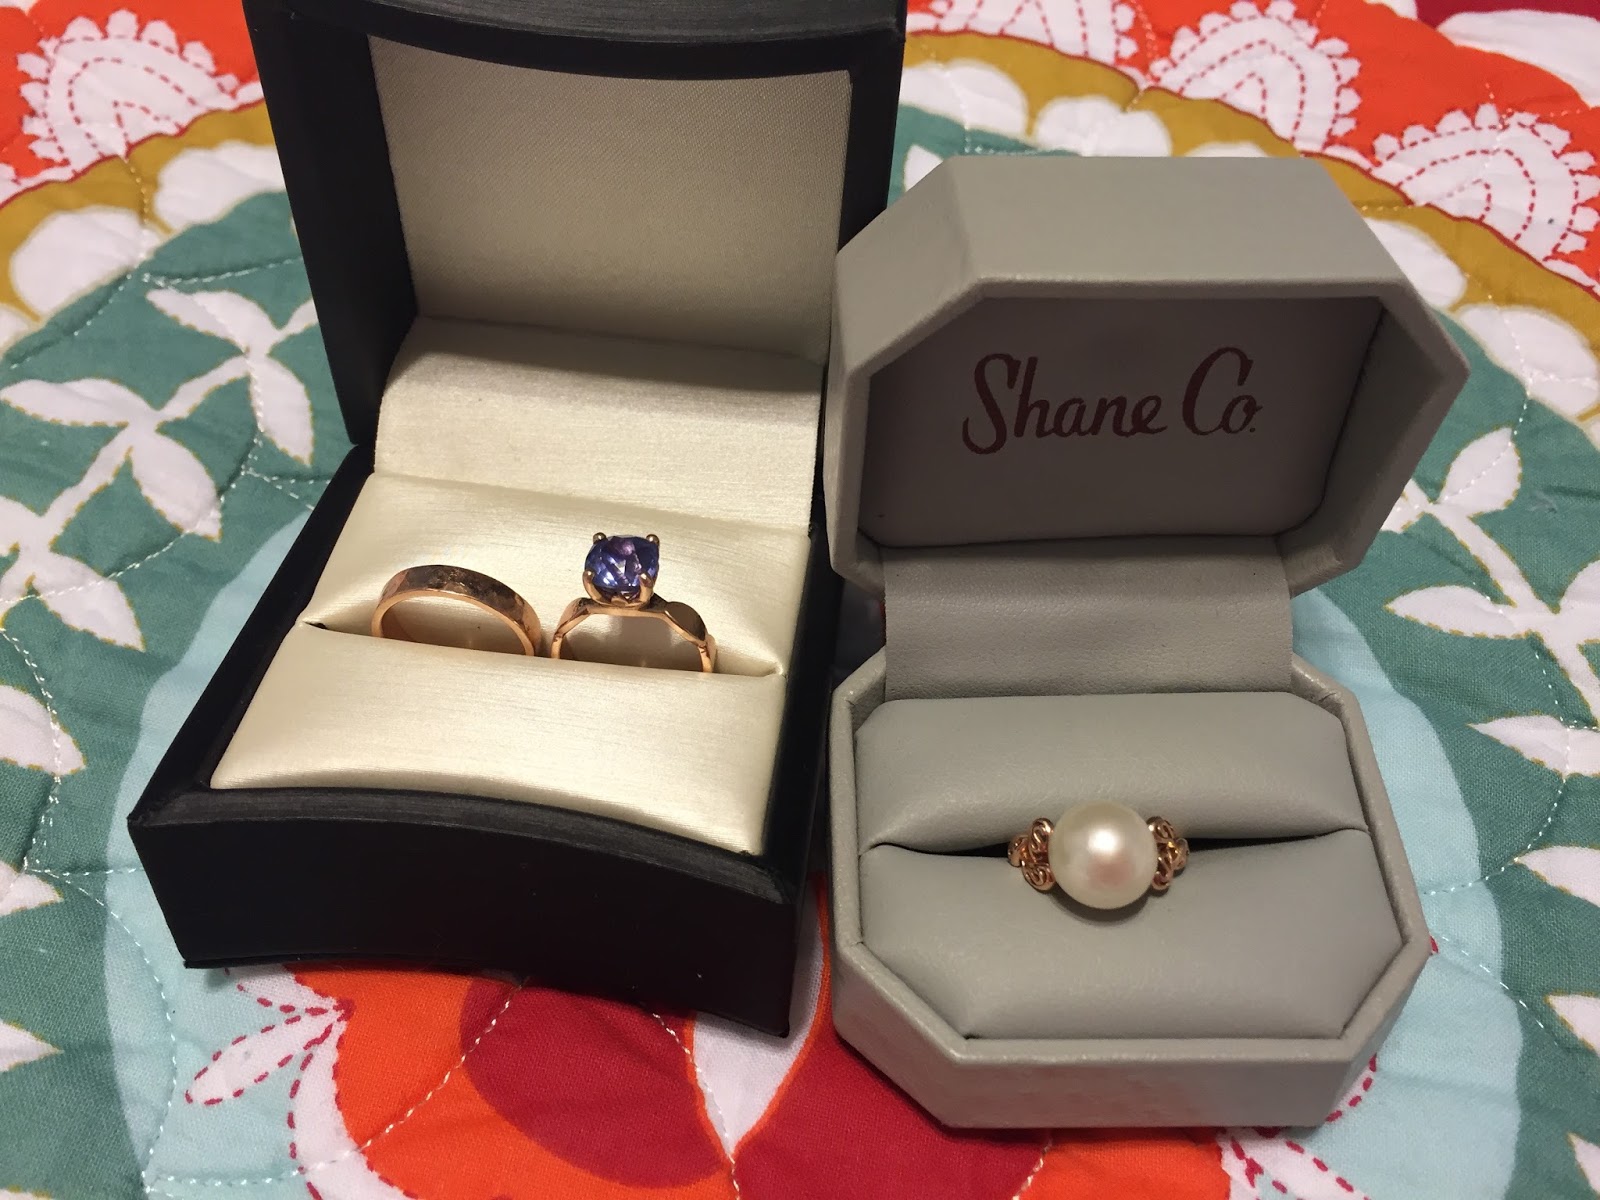
These lovely items stay safely at my home when we travel!
2. Costume and Statement Jewelry
These are pieces that can change an entire outfit! I am tremendously in favor of re-wearing clothes when I travel because I like to travel light. A colorful necklace, earrings, or bracelet can make a black outfit look completely different than if you wore the black outfit on its own. Turquoise goes with almost everything, and so do pearls. Or if there's a color you particularly love or one that looks best on you, plan to wear a couple of outfits that are different from each other, but that both go with that color and piece of jewelry. Instead of two outfits, you now have four combinations!

Chunky necklace, over-sized "pearl" earrings, and my favorite turquoise earrings. These items can take me from day to night, from basic and elegant black to fun and colorful!
3. Scarves
Scarves are so handy. A good scarf can be a cover-up for temples or other conservative places you may visit, a light blanket on a chilly plane, an accessory like the jewelry mentioned above, a wrap-around top, a bathing suit coverup, or perhaps for its intended purpose... a scarf! I almost never leave for a trip without a scarf, no matter what season or what the weather at my destination.

A few exciting scarves from my collection. I usually pick one per trip.
4. "Stuff" Carriers
In recent years, the travel industry has come up with stuff carriers that are leaps and bounds better than the fanny packs and money holders of yesteryear! Here's one that goes on your wrist and holds an iPhone 6 (they also make one big enough for the larger iPhone 6s). It also has a zipper pocket for cash or credit cards.

Cute wrist "purse."
And here's one that goes around your waist. I mostly use it when I run to carry my ID, keys, and maybe cash or a credit card if I plan to stop for coffee somewhere. But it can also be used when you're just walking around a new city and want a little extra security for your money. It has a clip for your keys, and it fits well under your clothes.

Handy dandy waist band with lot of pockets!
What other accessories do you use when you travel? What other tips do you have?
For more packing strategies, check out these blog posts:
Packing Strategies I: Roll with It!
Packing Strategies II: Tetris Packing and an Element of Fun
Packing Strategies III: Adventures in Toiletries
Monday, February 29, 2016
Packing Strategy III: Adventures in Toiletries!
This week's Packing Strategies post is all about... Toiletries!
There is nothing else in your carry-on or checked luggage that brings with it more rules and anxiety than your toiletries. How do I make sure they don't spill? Is this three or four ounces? Why can Europeans have 100 mL (3.38 oz), but Americans can only have three (88.72 mL)? Does my mousse count as a liquid? And what about dry shampoo? And I can only have a sandwich bag's worth of liquids? What's up with that?


Well, don't be baffled! Here are some tips and suggestions that might help you get the toiletries thing under control!
1. Solidify
The best way to eradicate the liquids problem is to use solid toiletries! That means solid bars of all kinds of things. They even make solid tablets of toothpaste these days! You won't have to worry about liquids spilling if they're not liquids to begin with! My friend Mellenie, creator of Truly-Life, makes natural soaps, lotions, and even bars that can be both body soap and shampoo! Check out her website: http://truly-life.com

Lotion Bar

Shampoo and Body Soap
2. Simplify
Forgot your toothbrush? They probably have an extra in your hotel lobby! Forgot your shampoo, soap, razor, lotion, and toothpaste? Most hotels and hostels have those, too. If you're really serious about packing lighter and simplifying your toiletries, you can just leave them at home! Check out the fine print on your hotel, hostel, or Air BnB website to see what they provide. You can also e-mail or call them if you want specifics. Some places even provide laundry facilities and detergent!
3. Coconut Oil
I've sung the praises of coconut oil before, but it's good enough to discuss again! It is solid at room temperature, but it can melt into a liquid at around 80 degrees, so I always follow the three-ounce rule with this one, but that's enough to get me through at least two weeks of travel because you don't have to use very much at a time. I use it for lotion, facial moisturizer, shaving lotion, hair masque (for what the beach, ocean water, and pool water do to my hair!), and even deodorant in a pinch!

4. "Travel Size" may not be the bargain you think it is!
And speaking of deodorant, regular sized deodorant is usually less than three ounces, so don't waste your money on "travel-size" when you can use what you already have in your own bathroom! I also make my own facial cleansing pads and take them with me, so I don't buy the facial wipes or liquid cleansers, then have to worry about how I'll transport the liquid in my carry-on. Take a look at your travel size items, then look at what you typically use and compare them. Is it worthwhile to get those travel-size items?
5. If All Else Fails
Keep in mind that if all else fails or you want to do away with packing toiletries altogether, you can buy what you need wherever you go! It may be a little different, the words on the packaging may be in a different language, but it'll get the job done! Don't be afraid to try something new or ask for help if you need it.
6. Last Tip
Just so you know... that regular-sized can of dry shampoo is a liquid! And it's more than three ounces. I've yet to see a travel-size dry shampoo container, but that doesn't mean they don't exist. Just be aware that many hair products do count as liquids, like mousse, gel, creams, waxes, etc. I once got pulled aside in the Vienna airport for my travel-size can of mousse because I didn't think to pull it out when going through the security screener!

Want more? Check out these past Packing Strategies posts!
Thursday, February 25, 2016
Packing Strategy II: Tetris Packing and an Element of Fun
"In every job that must be done, there is an element of fun. You find the fun and [SNAP!] the job's a game!" --Mary Poppins
Welcome to the second installment if Quick Whit's Packing Strategies! This time I'll be spilling my "Tetris Packing" secrets. Everything is more fun if you think of it as a game, right? Mary Poppins said so! Remember that game "Tetris" from the 90s? You had to turn and move different sized blocks so that they fit together, leaving no open spaces. Well, we can do that when we pack, too! Here are some simple tricks to have you packing more efficiently and effectively:
1. Find the Right Vessel
I could write a whole post about finding the best luggage (and I will do that one day soon!), but it bears mentioning here as well. Let's face it: not all bags are created equal! I've used all kinds, from the suitcases my parents used for their honeymoon in the 80's, to roller board suitcases for my three-month stint in Japan, to duffle bags, and finally to backpacks.
You have to find what works best for you, but from a packing standpoint, there are two factors that are most important: 1) weight; 2) expandability and retractability. You want something lightweight because you'll be lugging it (it's called "luggage" for a reason!). You also want something that can get larger or smaller as needed. I chose my backpack for many reasons, including the fact that there are straps that can be unbuckled to accommodate everything I need, but once it's closed, I can also buckle those straps and tighten them to really pack everything in and make it smaller, so it fits in the overhead bin without a problem! It's also handy to find one that either opens lengthwise, or one that opens at the top and the bottom. It's harder to lose things that way.


2. Start Big
In life, you usually have to start small. But in packing, it's best to start big! This is especially important if you're going to wintry destinations, and thus needing sweaters and other bulky things. The key is to roll and pack those things first, then fill in the spaces between and around those items with smaller things--like socks, undies, tights, camisoles, bathing suits, undershirts, pajamas, toiletries, etc. Anything that can be made small and stuffed into the crevices is fair game!

3. Use Your Shoes
I am the first to advocate for fewer shoes in your bags, but if you have to pack them, you need to use them! You know that space inside your shoes? The place where your feet go? Other things can fit there, too. Things like socks and underwear!


4. If at First You Don't Succeed, Try, Try Again!
I'll tell you one of my most embarrassing secrets: I don't always get it right the first time! Sometimes I have to take a few things out and do a little rearranging. Don't get discouraged or frustrated. Just outsmart your stuff! Take something out and roll it up tighter; turn your clothes upright instead of on their side; do whatever it takes to win at Tetris Packing! You can make it happen!
5. Find a Friend
If packing makes you truly stressed out and miserable, by all means, call in the reinforcements! My dear husband loves to travel, but he despises the packing part. I don't love it myself, but I do enjoy getting it accomplished! So he often calls on me to help him out. I pick out the basics, he fills in the other stuff he needs, we pack it together. Or I roll and he packs. He can do it on his own, sure, but I don't mind helping him out. If you have a friend or family member who gets into the packing and organizing of stuff, allow them to use their gift for good!

For more packing strategies, check out:
Packing Strategy I: Roll with It!
Welcome to the second installment if Quick Whit's Packing Strategies! This time I'll be spilling my "Tetris Packing" secrets. Everything is more fun if you think of it as a game, right? Mary Poppins said so! Remember that game "Tetris" from the 90s? You had to turn and move different sized blocks so that they fit together, leaving no open spaces. Well, we can do that when we pack, too! Here are some simple tricks to have you packing more efficiently and effectively:
1. Find the Right Vessel
I could write a whole post about finding the best luggage (and I will do that one day soon!), but it bears mentioning here as well. Let's face it: not all bags are created equal! I've used all kinds, from the suitcases my parents used for their honeymoon in the 80's, to roller board suitcases for my three-month stint in Japan, to duffle bags, and finally to backpacks.
You have to find what works best for you, but from a packing standpoint, there are two factors that are most important: 1) weight; 2) expandability and retractability. You want something lightweight because you'll be lugging it (it's called "luggage" for a reason!). You also want something that can get larger or smaller as needed. I chose my backpack for many reasons, including the fact that there are straps that can be unbuckled to accommodate everything I need, but once it's closed, I can also buckle those straps and tighten them to really pack everything in and make it smaller, so it fits in the overhead bin without a problem! It's also handy to find one that either opens lengthwise, or one that opens at the top and the bottom. It's harder to lose things that way.
My friend Samantha agreed to participate in the photo shoot for size comparison purposes. She's a good sport!

Empty.

Stuffed with 5 large bath towels. Can't even get the upper flap down!

Still stuffed, but now all the straps are buckled and pulled tight. I even got the upper flap closed and locked into place!
2. Start Big
In life, you usually have to start small. But in packing, it's best to start big! This is especially important if you're going to wintry destinations, and thus needing sweaters and other bulky things. The key is to roll and pack those things first, then fill in the spaces between and around those items with smaller things--like socks, undies, tights, camisoles, bathing suits, undershirts, pajamas, toiletries, etc. Anything that can be made small and stuffed into the crevices is fair game!

That's my bulkiest sweater. It need to go in first. See that tiny blue thing? That goes in after the big stuff to fill in the smallest of spaces!
3. Use Your Shoes
I am the first to advocate for fewer shoes in your bags, but if you have to pack them, you need to use them! You know that space inside your shoes? The place where your feet go? Other things can fit there, too. Things like socks and underwear!

Stuffed running shoes.

Four pair of socks in each shoe! That's more than a week's worth. Just imagine the things you can fit into boots!
4. If at First You Don't Succeed, Try, Try Again!
I'll tell you one of my most embarrassing secrets: I don't always get it right the first time! Sometimes I have to take a few things out and do a little rearranging. Don't get discouraged or frustrated. Just outsmart your stuff! Take something out and roll it up tighter; turn your clothes upright instead of on their side; do whatever it takes to win at Tetris Packing! You can make it happen!
5. Find a Friend
If packing makes you truly stressed out and miserable, by all means, call in the reinforcements! My dear husband loves to travel, but he despises the packing part. I don't love it myself, but I do enjoy getting it accomplished! So he often calls on me to help him out. I pick out the basics, he fills in the other stuff he needs, we pack it together. Or I roll and he packs. He can do it on his own, sure, but I don't mind helping him out. If you have a friend or family member who gets into the packing and organizing of stuff, allow them to use their gift for good!

Packing Pals Forever!
For more packing strategies, check out:
Packing Strategy I: Roll with It!
Saturday, February 20, 2016
Seoul Mates: Valentine's Day in South Korea!
Happy Valentine's Day! OK, so it's a little late by now, but we spent our Valentine's Day in Seoul!
Fun fact: In South Korea, Valentine's Day is all about the boys! Yes indeed, ladies first... the girls buy gifts for the their boyfriends or significant others that day. But never fear! March 14 is White Day, the day that provides the boys a chance to give a gift to their lady friends. By the way, it's customary for the boys to pay three times more for their girl's gift!

Valentine's Day came early for us, thanks to our 6:00 pm bedtime. Yep, up at 1:00am! We did our best to rest until the gym opened at 6:00 am. And we decided to try out the hotel's other breakfast restaurant, Asian Live. It had more of an Asian feel by decoration and atmosphere, but the food was largely the same as the other restaurant! Either way, we had sushi for breakfast, which is of course, the world's best breakfast.
Then it was time to set out! We had decided that we'd try out the Seoul Metro system, since things are so spread out, and head to the Palace District. I took our guidebook and map to the concierge and asked how to get there and how to use their system (somewhere I'd read that it is a confusing system if you don't speak Korean). Turns out, it's very similar to DC's metro system with colored and numbered train lines, and it's directionally-based! Easy as pie. It took a minute to figure out how to use their ticket kiosks, but once we got it, we had it! The system is huge--over 650 with more being added!--but we felt pretty confident about it.

Fortunately for us, there is a metro stop that is semi-attached to the COEX mall, which is attached to our hotel! So we only had to walk outside for a few steps on our way to the metro. It was COLD that day!
We popped up out of the metro at the right stop, but the wrong exit, so we wandered around a little bit... and upon approaching the Gyeongbokgung Palace, we realized that the correct exit was right next to the Palace Museum. Whoops! But just a few steps farther was this:

Feng Shui says that it's best to have a river in front of a house, and a mountain behind the house. You can't see it, but there is a river, and of course you see the mountain! We read that there would be an English tour in about an hour, so we spent a while in the Palace Museum to keep warm while we waited.
The tour was great! Our guide was Korean, but spoke excellent English. She did her best to keep us out of the wind, since we couldn't actually go into any of the buildings. She did a good job! She was upbeat and positive the whole time, except when she had to mention the Japanese. That was a dark spot. There are five palaces for the royal family that ruled for over 500 years, but the Gyeongbokgung is the main palace and the largest complex. When the Japanese came in (one of the times they came in), they destroyed 90% of this palace. They have only been able to restore less than half of it so far, but it's an ongoing project! The history is complex and interesting. It even kept my interest in the cold and wind!
After the tour, it was high time to find a warm beverage! Thankfully, there is another museum--the Korean Folk Museum--just outside the palace walls, and they have a cafe! It was a little crowded, but we got served fast! Steve got a caramel macchiato, but I got the more exotic and exciting sweet potato latte! =)
After warming up so we could feel our toes again (I'm so glad I brought boot socks and my long johns!), we explored the Folk Museum. Fewer of the exhibits were in both Korean and English, so we mostly look at things instead of reading what they were.
Ready to head back into the cold? Here we go! The plan was to head back to the COEX district and find a Starbucks mug for our collection. Given the extensive size of Seoul's metro system, it took a while to get back! We walked around to find a Starbucks (one of 284!), picked up their unique Seoul mug, and set out for our hotel.

The only thing about our hotel that was less than ideal for us was that the internet is only free in the lobby and common areas, not in each room. But we made the most of it! We found a quiet spot, brought down a cracker and some grape juice, and picked an old sermon from my congregation's website back home. Technology makes life a lot easier! We did our "church" service, took a quick nap, and headed out to find supper. And what did we pick... Sushi! I told Steve he could pick, but he chose sushi because he loves me and wants me to be happy!
After sushi, we were pretty exhausted! I guess that's just what happens when you wake up at 1:00 am! We slept while we could, read when we woke up at 1:00 am again, went to the gym, enjoyed a leisurely breakfast (with sushi!), and waited for our cab driver to pick us up. The hour drive to the airport was uneventful, but the line for security was unbelievable! I don't know if Steve and I are just spoiled because of TSA Pre-check back home, but I'm pretty sure something about the security process at Incheon was broken.
Anyway, we made it home! Where will we go next? You'll have to wait and see! In the mean time, I'll be posting once a week about some packing strategies I have. Get excited!
For more pictures, click here!
Fun fact: In South Korea, Valentine's Day is all about the boys! Yes indeed, ladies first... the girls buy gifts for the their boyfriends or significant others that day. But never fear! March 14 is White Day, the day that provides the boys a chance to give a gift to their lady friends. By the way, it's customary for the boys to pay three times more for their girl's gift!

Bundled up with Valentine's Love!
Valentine's Day came early for us, thanks to our 6:00 pm bedtime. Yep, up at 1:00am! We did our best to rest until the gym opened at 6:00 am. And we decided to try out the hotel's other breakfast restaurant, Asian Live. It had more of an Asian feel by decoration and atmosphere, but the food was largely the same as the other restaurant! Either way, we had sushi for breakfast, which is of course, the world's best breakfast.
Then it was time to set out! We had decided that we'd try out the Seoul Metro system, since things are so spread out, and head to the Palace District. I took our guidebook and map to the concierge and asked how to get there and how to use their system (somewhere I'd read that it is a confusing system if you don't speak Korean). Turns out, it's very similar to DC's metro system with colored and numbered train lines, and it's directionally-based! Easy as pie. It took a minute to figure out how to use their ticket kiosks, but once we got it, we had it! The system is huge--over 650 with more being added!--but we felt pretty confident about it.

Mr. Peabody Pembroke rides the rails!
Fortunately for us, there is a metro stop that is semi-attached to the COEX mall, which is attached to our hotel! So we only had to walk outside for a few steps on our way to the metro. It was COLD that day!
We popped up out of the metro at the right stop, but the wrong exit, so we wandered around a little bit... and upon approaching the Gyeongbokgung Palace, we realized that the correct exit was right next to the Palace Museum. Whoops! But just a few steps farther was this:

Feng Shui says that it's best to have a river in front of a house, and a mountain behind the house. You can't see it, but there is a river, and of course you see the mountain! We read that there would be an English tour in about an hour, so we spent a while in the Palace Museum to keep warm while we waited.
The tour was great! Our guide was Korean, but spoke excellent English. She did her best to keep us out of the wind, since we couldn't actually go into any of the buildings. She did a good job! She was upbeat and positive the whole time, except when she had to mention the Japanese. That was a dark spot. There are five palaces for the royal family that ruled for over 500 years, but the Gyeongbokgung is the main palace and the largest complex. When the Japanese came in (one of the times they came in), they destroyed 90% of this palace. They have only been able to restore less than half of it so far, but it's an ongoing project! The history is complex and interesting. It even kept my interest in the cold and wind!
After the tour, it was high time to find a warm beverage! Thankfully, there is another museum--the Korean Folk Museum--just outside the palace walls, and they have a cafe! It was a little crowded, but we got served fast! Steve got a caramel macchiato, but I got the more exotic and exciting sweet potato latte! =)
After warming up so we could feel our toes again (I'm so glad I brought boot socks and my long johns!), we explored the Folk Museum. Fewer of the exhibits were in both Korean and English, so we mostly look at things instead of reading what they were.
Ready to head back into the cold? Here we go! The plan was to head back to the COEX district and find a Starbucks mug for our collection. Given the extensive size of Seoul's metro system, it took a while to get back! We walked around to find a Starbucks (one of 284!), picked up their unique Seoul mug, and set out for our hotel.

The mug!
The only thing about our hotel that was less than ideal for us was that the internet is only free in the lobby and common areas, not in each room. But we made the most of it! We found a quiet spot, brought down a cracker and some grape juice, and picked an old sermon from my congregation's website back home. Technology makes life a lot easier! We did our "church" service, took a quick nap, and headed out to find supper. And what did we pick... Sushi! I told Steve he could pick, but he chose sushi because he loves me and wants me to be happy!
After sushi, we were pretty exhausted! I guess that's just what happens when you wake up at 1:00 am! We slept while we could, read when we woke up at 1:00 am again, went to the gym, enjoyed a leisurely breakfast (with sushi!), and waited for our cab driver to pick us up. The hour drive to the airport was uneventful, but the line for security was unbelievable! I don't know if Steve and I are just spoiled because of TSA Pre-check back home, but I'm pretty sure something about the security process at Incheon was broken.
Anyway, we made it home! Where will we go next? You'll have to wait and see! In the mean time, I'll be posting once a week about some packing strategies I have. Get excited!
For more pictures, click here!
Thursday, February 18, 2016
150 Posts! Coming to you from Seoul
We made it! We're up to 150 blog posts! Y'all are some voracious readers!
For this little excursion, Steve and I kept our whereabouts a secret so all our friends could play Mr. Peabody Pembroke's postcard game. He posts hints and pictures to his Facebook page, and whoever guesses where he is first, wins a postcard! "Like" his page and you could win next time!

This time around, we decided to explore Seoul, South Korea. I'd never been, but Steve had been a few times several years ago when he worked for Motorola. He said he wants to go to all the places he's already been without me so he can make new memories with me in all of those places. Awwwww. =)
We left last Thursday, and things went pretty well on the way over. Well, except that I somehow lost my newfound skill of sleeping on airplanes! But I got a lot of reading accomplished on the 14 hour flight to Narita Airport in Tokyo! From there, it was a short two hour flight to Incheon Airport in Seoul. Fortunately, we landed on time despite a very heavy fog. Unfortunately, something somewhere went horribly wrong after that... We ended up waiting in line at customs for an hour and a half and missed the last bus to our hotel! So we took a cab instead, which was more expensive, but not only was it faster than the bus, it was also our only option that time of night!
Thankfully, the woman at the front desk was incredibly kind and helpful. And she was shocked that it took us so long to get through customs! That's how we knew something was unusual about that. Needless to say, we were pretty pooped by the time we got to the room and fell into bed!
We set an alarm for 7:00 so we wouldn't sleep too late--no time for jet lag on a three-day trip! We were still pretty sleepy, but we powered through! After a trip to the hotel gym to reinvigorate ourselves, we raided the amazing breakfast buffet (any breakfast buffet that includes sushi is a breakfast buffet for me!), we decided to explore the Buddhist Temple across the street, which we had a great view of from the room!

It's called the Bongeunsa Temple, and it's a fully operating temple from the year 749! It's so interesting to see something historic like that right in the middle of the skyscrapers and Starbuckses of the 21st century!
It was supposed to rain all day long, but it held off for the morning. We decided to take advantage of the cloudy (but not yet rainy!) weather and took a walk over to some burial mounds, which are like the Korean version of the Pyramids in Egypt. It's an absolutely beautiful park in the middle of town, and if I'd planned it a little better, I would have brought some cold weather running clothes so I could have run there! The previous days' rain had made the dirt trails rather squishy, but it was still nice to have such a peaceful place in the middle of the big city.

By the time we finished there, we decided we'd pushed our luck with the weather far enough. To the COEX! I have no idea what that stands for, but that's the nickname for the area where we were staying. There's a huge underground mall next to our hotel, but after about half an hour of walking around under there with no windows, we decided above ground was better for us and our jet lag! The rain was holding off nicely still, so we got a little lost outside and tried to find a few more sites to see. Did you know Seoul is a HUGE city? I was shocked at how far apart all the sites were!
We eventually found ourselves getting much-needed caffeinated beverages and a snack at one of the many Starbuckses in the area. It was delightful! Maybe it was the overcast skies, maybe it was the jet lag, maybe it was forcing ourselves to wake up at 7:00; whatever it was, we enjoyed sitting for a spell!

Around 4:00, we were ready for an early dinner. Can you guess what I wanted? Sushi! And Steve was kind enough to oblige. Our only mistake? Going to sleep at 6:00pm!
Check back tomorrow for our Valentine's Day excursions!
For pictures, click here!
For this little excursion, Steve and I kept our whereabouts a secret so all our friends could play Mr. Peabody Pembroke's postcard game. He posts hints and pictures to his Facebook page, and whoever guesses where he is first, wins a postcard! "Like" his page and you could win next time!

This time around, we decided to explore Seoul, South Korea. I'd never been, but Steve had been a few times several years ago when he worked for Motorola. He said he wants to go to all the places he's already been without me so he can make new memories with me in all of those places. Awwwww. =)
We left last Thursday, and things went pretty well on the way over. Well, except that I somehow lost my newfound skill of sleeping on airplanes! But I got a lot of reading accomplished on the 14 hour flight to Narita Airport in Tokyo! From there, it was a short two hour flight to Incheon Airport in Seoul. Fortunately, we landed on time despite a very heavy fog. Unfortunately, something somewhere went horribly wrong after that... We ended up waiting in line at customs for an hour and a half and missed the last bus to our hotel! So we took a cab instead, which was more expensive, but not only was it faster than the bus, it was also our only option that time of night!
Thankfully, the woman at the front desk was incredibly kind and helpful. And she was shocked that it took us so long to get through customs! That's how we knew something was unusual about that. Needless to say, we were pretty pooped by the time we got to the room and fell into bed!
We set an alarm for 7:00 so we wouldn't sleep too late--no time for jet lag on a three-day trip! We were still pretty sleepy, but we powered through! After a trip to the hotel gym to reinvigorate ourselves, we raided the amazing breakfast buffet (any breakfast buffet that includes sushi is a breakfast buffet for me!), we decided to explore the Buddhist Temple across the street, which we had a great view of from the room!

It's called the Bongeunsa Temple, and it's a fully operating temple from the year 749! It's so interesting to see something historic like that right in the middle of the skyscrapers and Starbuckses of the 21st century!
It was supposed to rain all day long, but it held off for the morning. We decided to take advantage of the cloudy (but not yet rainy!) weather and took a walk over to some burial mounds, which are like the Korean version of the Pyramids in Egypt. It's an absolutely beautiful park in the middle of town, and if I'd planned it a little better, I would have brought some cold weather running clothes so I could have run there! The previous days' rain had made the dirt trails rather squishy, but it was still nice to have such a peaceful place in the middle of the big city.

The mound in the back is the gravesite. There are statues and markers up there, but unfortunately no one can see them!
By the time we finished there, we decided we'd pushed our luck with the weather far enough. To the COEX! I have no idea what that stands for, but that's the nickname for the area where we were staying. There's a huge underground mall next to our hotel, but after about half an hour of walking around under there with no windows, we decided above ground was better for us and our jet lag! The rain was holding off nicely still, so we got a little lost outside and tried to find a few more sites to see. Did you know Seoul is a HUGE city? I was shocked at how far apart all the sites were!
We eventually found ourselves getting much-needed caffeinated beverages and a snack at one of the many Starbuckses in the area. It was delightful! Maybe it was the overcast skies, maybe it was the jet lag, maybe it was forcing ourselves to wake up at 7:00; whatever it was, we enjoyed sitting for a spell!

Around 4:00, we were ready for an early dinner. Can you guess what I wanted? Sushi! And Steve was kind enough to oblige. Our only mistake? Going to sleep at 6:00pm!
Check back tomorrow for our Valentine's Day excursions!
For pictures, click here!
Tuesday, February 9, 2016
Packing Strategy I: Roll with It!
People often take one look at my luggage and tell me I can't possibly have packed enough for my trip, no matter how long or short! They ask me how I do it, and now I'm sharing my secrets with you in this series about packing strategies!
Packing Strategy I: Roll with It!
Undies:


T-shirts:


Camisoles:


Pants:


Packing Strategy I: Roll with It!
Rolling is by far the best trick I've learned in all my years of packing. I read about it in American Girl Magazine when I was probably 11 or 12, and I've been doing it ever since, even in my drawers at home! My older brother used to bring his friends into my room to show them my unbelievably organized drawers of rolled up clothes. Seriously though, you save so much more space by rolling instead of folding, and here is your step by step tutorial, Quick Whit style! Let's start from the bottom up.
Undies:

Yes, I've used my frilliest, brightest ones for this demonstration! Did that get your attention? Start with them laying flat on a flat surface.

Fold in half, lengthwise.

Fold in half again, lengthwise.

Start rolling at one end. Remember to roll tightly!

The finished product! Ready for packing.
Socks:

Socks!

Put them one on top of the other.

Open one side wide.

Fold the larger opening around the other sock. Ready to go!

Start flat.

Fold in half, lengthwise.

Fold sleeves over.

Fold the shirt in half, lengthwise.

Start rolling from one end.

Done!
Camisoles:

Start flat.

Fold in half, horizontally.

Fold in half, lengthwise.

Roll it up!
Long-sleeved shirts and sweaters:
Start flat.

Fold in half, lengthwise; make sure the sleeves line up.

Fold sleeves over; be sure to line up the corner of the sleeve to the crease in the shirt.

Fold lengthwise once more. Now you have a long rectangle.

Start rolling! Be sure to roll it tightly so it will turn out as small as possible.
Pants:

Start flat.

Fold lengthwise.

Fold the crotch over, making sure the point touches the straight end.

Fold in half, horizontally, making them shorter.

Roll from one end.

Ta-da! Now, you're ready to pack!
Basically, no matter what shape it is starting out, make it a rectangular or square as best you can, and then roll it as tightly as possible.
Tune in soon for more packing strategies! And to find out where Steve and I are headed next. Mr. Peabody Pembroke will post a hint on Facebook sometime between Thursday and Friday this week! Guess where we are, and you'll win a prize!
Tune in soon for more packing strategies! And to find out where Steve and I are headed next. Mr. Peabody Pembroke will post a hint on Facebook sometime between Thursday and Friday this week! Guess where we are, and you'll win a prize!
Subscribe to:
Comments (Atom)